This blog post may contain affiliate links. If you click on these links and make a purchase, I may receive a commission at no extra cost to you. Please note that this blog is primarily for educational purposes and the content here is not intended to be a substitute for professional financial advice. Please review my disclaimer and terms here.
Amazon hijackers are the worst.
Hijackers are people who go on your Amazon product page and set up as also being sellers of your mugs and other items. In many cases they advertise it for cheaper than you do so they can get sales. And sometimes they also even steal your “buy box.”
They can take a serious toll on your business’ bottom line and cause major frustration.
And for the most part, you never see them coming. So what can you do to prevent hijackers from stealing your stuff?
Well, you need to take control of your brand’s product listings. And you can do this by enrolling in Amazon’s Brand Registry.
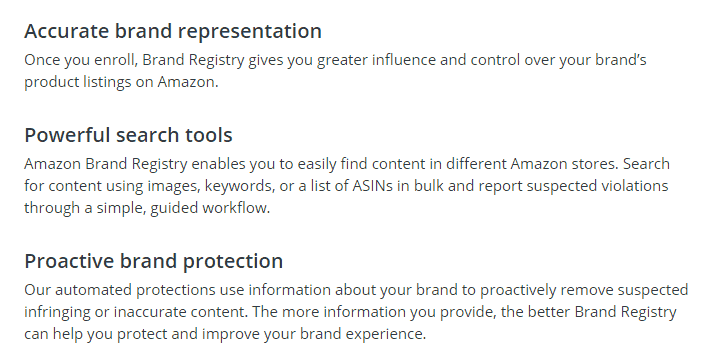
If you want to find and report hijackers and be proactive about preventing violations in the first place, Brand Registry is the way to go.
I enrolled my brand a while back and it’s been helping, for sure!
And so, to make the enrollment process as painless as possible, I go over the steps involved in detail below and share key tips and resources from my own enrollment experience.
I also created a unique done-for-you service to help with a specific portion of your Brand Registry enrollment, and you’ll learn more about that at the end.
Let’s dive in…
How to enroll in Amazon Brand Registry
Amazon sets forth three basic steps to the process:
- Review eligibility requirements
- Sign into Amazon Brand Registry
- Enroll your brand
Of course, it’s a bit more complicated than just that. You also need to create a logo and get a trademark. But I’ll walk you through everything you need to do below.
1. Review eligibility requirements
Amazon has the following eligibility requirements to enroll in Brand Registry:
- You need an active registered trademark for each country in which you want to enroll (more on how to get trademarked below).
- Your trademark needs to be either a text-based mark or an image-based mark with words, letters, or numbers (you need to create a logo for your brand — more on that down below, too).
- Your trademark needs to have been issued by government trademark offices in one of the following countries:
NOTE: If you register your trademark with the World Intellectual Property Organization (WIPO), you need to submit the number registered with the IPO office in your country instead.
Also, make sure your trademark text matches the brand name on your application before you submit your application.
You can review more specific eligibility requirements by country here. For example, here’s what Amazon says about the United States:

Here’s how to create your logo
For my brand name, I created a super simple logo. Your logo seriously doesn’t need to be fancy at all.
I had someone on my team, who is NOT a designer, whip one up for me. You just want to have something to put on your products and packaging.
So this is something that you could totally DIY. Or you could use Fiverr.com or just google “free logo generator.” When I ran that search, here are the top results I got:
Once you create your logo, you’ll also need to have stickers made with your logo on them (more on how the stickers come into play down below).
Here’s how to get trademarked
I personally used Trademarkia.com. My trademark registration cost $199 + government fees, and the application process took about five minutes.
I’ll walk you through how to use that site specifically, but you can use any trademarking resource you want. Whichever way you go though, I recommend that you do it as soon as possible since you will need to wait some time for your trademark to get approved.
To learn how the Trademarkia process works in detail, watch this video.
NOTE: I did find there to be some discrepancies during my application process and what’s shown in the video. But the video is still a great resource.
Here’s an overview of the process I went through:
Step 1 – Specify what you want to protect: name, logo, name + logo. Then, enter a contact email and create a password.
I chose name only here.

Next, you need to answer whether you’re currently using your trademark. If you answer affirmatively, you’ll need to specify the products, services, or products & services you’re offering that feature your trademark.
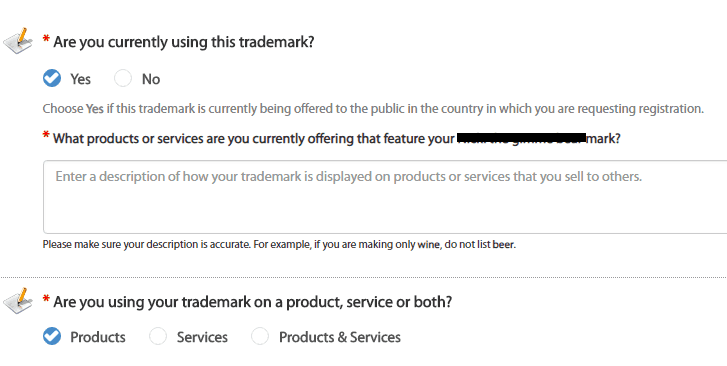
Or if you answer negatively, you’ll need to specify the products, services, or products & services that you plan to brand with your trademark in the future.
Step 2 – You need to select the class(es) that best match your business. Basically, you need to choose the products you sell. You can also select more than one class if applicable.
For my trademark, I chose just one class: houseware and glass products.
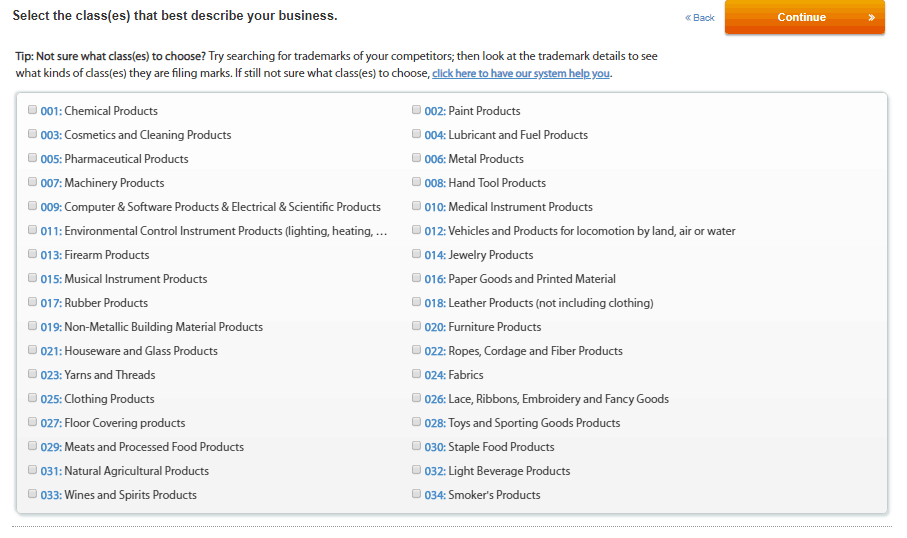
Then, you need to provide information about the products your trademark will represent for each of the classes you chose. For example…

I kept my description VERY simple and just said something like “ceramic mugs.”
Step 3 – Specify whether the owner of the trademark is an individual or an organization.
Individual
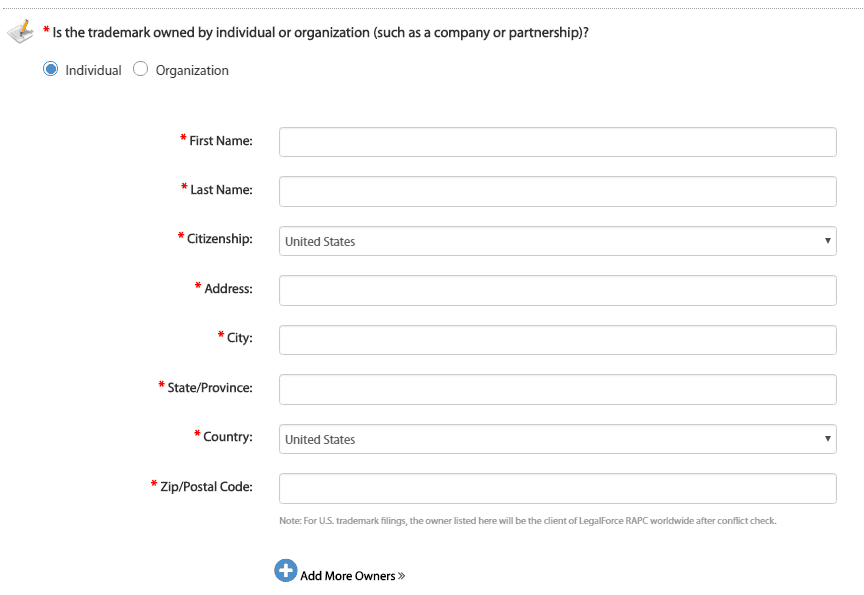
Organization
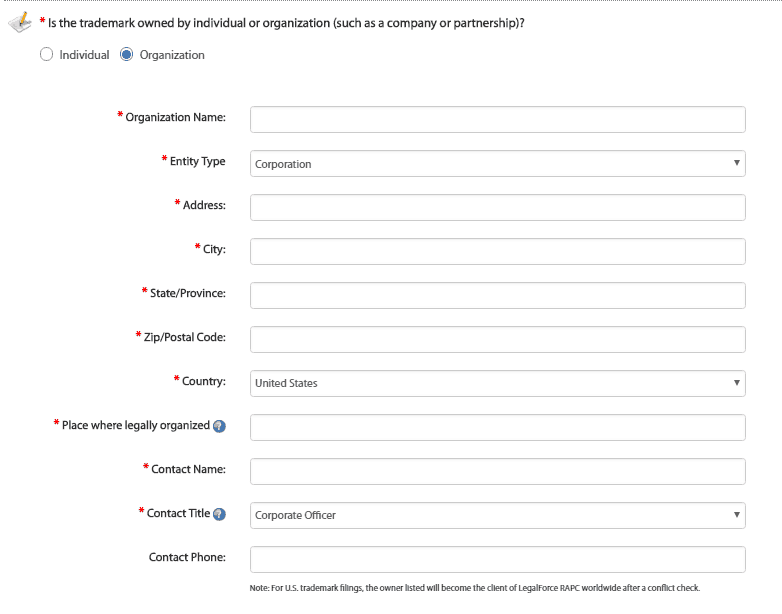
Choose whether you want to pay government fees to submit your trademark application to the government or create a Business Page on Trademarkia for $99 per mark.
If you go with the Business Page option, you need to specify where your trademark is recognized.

I honestly can’t remember which option I went with, although I don’t recall setting up a Business Page. But I’d recommend going with the simplest choice.
Next, you need to select the country in which you want to register your trademark.
NOTE: Pricing depends on which option you chose on the previous page and which country or countries you choose.
I went with USA only.
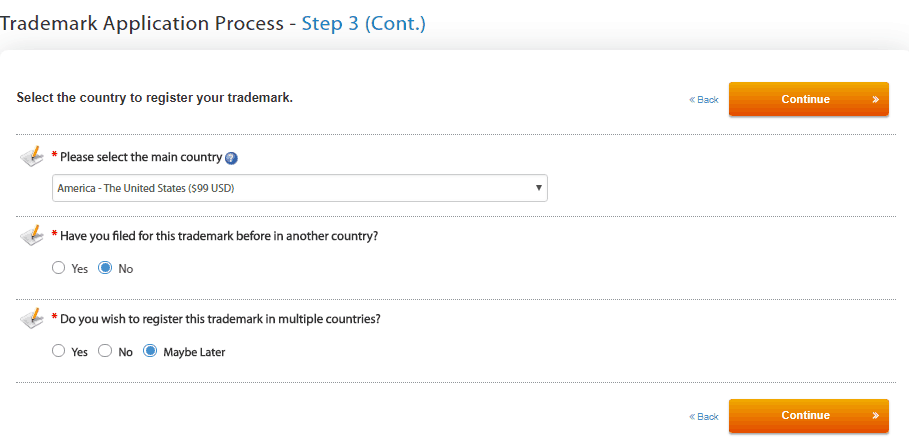
On the next page, review and accept the terms and conditions, and Trademarkia will let you know the cost. Again, pricing will vary so I can’t say for sure how much all of this will run you.
Next, review your application and continue through the payment options that make the most sense for you.
Trademarkia also provides the following optional add-ons:
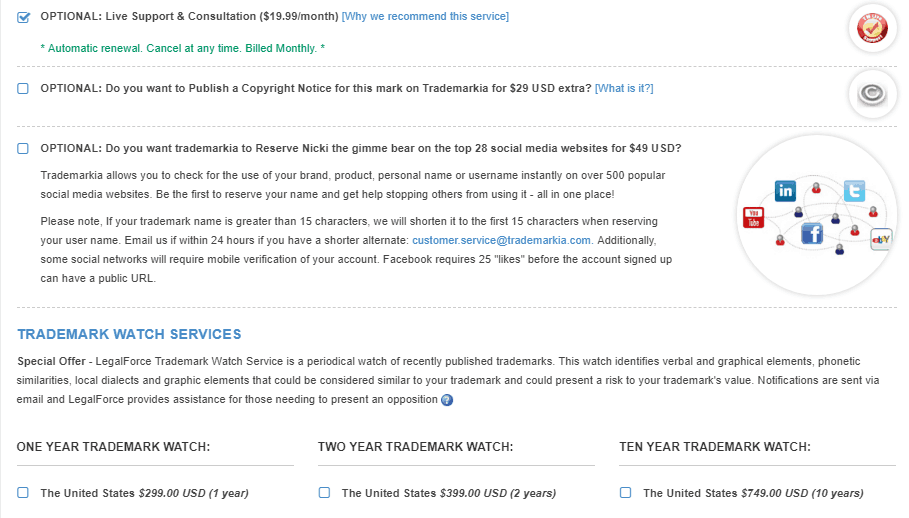
You can submit your payment via credit card, PayPal, or Amazon Pay.
Once you do this, you’ll have to wait a while to get your trademark approved. After you do that you can move to Step #2.
2. Sign into Amazon Brand Registry
If you’re an Amazon vendor or seller, which you most likely are if you do the Low Hanging System, you can sign in using your Vendor or Seller Central login information.
This way, you can get full access to the Brand Registry features and benefits that are linked to Vendor and Seller Central services.
3. Enroll your brand
Here’s what Amazon says about enrolling your brand:

Enroll now
After clicking the enroll now button, choose the country where you have your trademark and want to enroll.
After selecting your country, you’ll be directed to sign in to Amazon Brand Registry. Again, use the same user name and password as your Seller Central account.
On the Amazon Brand Registry Application page, you’ll need to fill out your name, email, phone number, company website, company description, and brand name. Then, click Continue.

Next, you’ll need to enter some information about your brand.

You’ll also need to upload an image of your product packaging with branding (your logo) visible on the package as well as an image of your product with branding visible on the product itself.
This is where those logo stickers I mentioned earlier come into play…
To get the images Amazon wants, here’s what I did:
I put a transparent logo sticker on the bottom of one of my mugs as well as on a clamshell mailer that we ship our products in.
I also put a sticker on my packing slip, which included my brand name and address on the return slip.
I took photos of all these items with my logo visible, uploaded them, and clicked submit.
And that’s pretty much exactly what you’ll need to do, too.
(If that sounds too complicated, however, don’t worry. Keep reading below and I’ll tell you how you can get this process done for you.)

After submitting your application, Amazon will reach out within a few days, letting you know how long the process should take and if anything else is needed. You may need to set up a phone call to go over your application as well. I didn’t need to do this, however.
NOTE: After your application is accepted, I’m not sure if you’re then supposed to send every product and every package with your branding on it.
I can tell you only that we haven’t done this for every single product and package that we’ve since shipped and it’s been okay. But you run your business as you desire and this is not official advice.
So… has it helped with the hijackers?
After you get Brand Registry enabled, you can report hijackers who are on your listings.
At first, a lot of the hijackers went away automatically.
I still had some stubborn hijackers on my listings though, and Amazon wouldn’t accept my submission reports. They said that I had reported too many violations and said that they would no longer accept my submissions unless a lawyer submitted them.
After hiring a lawyer (Autumn) to submit everything, the hijackers finally went away.
I have Autumn working on an ongoing basis, but you could also hire her – or any lawyer, really – to do piecemeal work.
Hopefully you won’t ever get to that point and can continue to report violations yourself, but if you do get that error message, I’ve found the expense to be worth it and have made more in sales than I did off of lawyer fees.
Key takeaways and action steps:
- Create a logo for your brand using Fiverr or a free logo-generator tool.
- Register your trademark using Trademarkia.
- Fill out Amazon’s application to enroll in Brand Registry.
- Check out my Brand Registry Photos service.
And if you want help with your Brand Registry photos…
To help make the process simpler for you, I decided to offer a unique done-for-one service that helps with your Brand Registry enrollment. You can learn more about it here.
This is something that I don’t want to be a core tenet of my business model and is actually a bit of a headache, but I am offering it as a “make it easier for you” service. You need these things done one way or another in order to get Brand Registry.
Basically, since Amazon requires images of your product and your product packaging with your branding visible, I wanted to help make it easy for you to get these images.
You can send me your brand name, logo, and an example design file and my team will create the images for you.
This done-for-you service currently costs $250. And again, you can learn more of the details here.
What do you think about enrolling in Brand Registry? I hope this post makes the process a little clearer! If you have any questions, please leave a comment below. And if you liked this post, please share it with your followers!


5 thoughts on “How to enroll in Amazon’s Brand Registry and protect your business from hijackers”
All the points you have mentioned, are really useful. Especially about reading anything and everything.
Reading is the best way to improve writing skills.
Admiring the time and effort you put into your website and in-depth information you present. It’s nice to come across a blog occasionally which is just not the similar expired rehashed stuff. Fantastic read! We have saved your blog and I’m adding the RSS feeds to my own blog.
Thank you for the kind words and I’m so glad to hear you got something from the content!
Wow that was unusual. I just wrote an incredibly long comment but after I clicked submit my comment didn’t show up. Grrrr… well I’m not writing all that over again. Anyhow, just wanted to say superb blog!
Testing…