This blog post may contain affiliate links. If you click on these links and make a purchase, I may receive a commission at no extra cost to you. Please note that this blog is primarily for educational purposes and the content here is not intended to be a substitute for professional financial advice. Please review my disclaimer and terms here.
If you want to have a successful online business, tracking your progress is an important part of the process.
And while tracking may not be the sexiest task on your to-do list, it is necessary if you want to ensure that your website and/or ecommerce business is getting the best possible results in terms of traffic, engagement, and sales.
I know some people shy away from tracking because it seems challenging and confusing, which is understandable. But Google Analytics is a free tracking tool that’s available to anyone with a Google account, and once you get over the initial hump of setting it up, it’s actually pretty easy to navigate and the benefits outweigh the challenges.
You can use analytics to:
- See which search terms people are using to find you
- Test out new strategies and see if they are working
- Check conversion rates on each of your products (how many people view your pages and end up purchasing)
Google Analytics tells you these things and so much more. Below, I’ll share some of the ways you can use this tool to drive more traffic and sales to your stores. Then, I’ll walk you through how you can set up Google Analytics to work with Etsy, eBay, and UseGearBubble.
(NOTE: If you don’t have a Google Analytics account yet, scroll to the end of this post where you’ll learn how to set that up.)
(NOTE #2: This isn’t available for Amazon. If it was, I’d tell you how to do it. :))
Here’s How Google Analytics Can Improve Your Business:
Here are some of the things you can do with analytics:
Ecommerce reports: You can find multiple reports here, including product and sales performance, transactions, and time to purchase, all of which show you important data, like your visitors’ preferred price ranges and your most popular products.
(Here’s how to find these reports: Google Analytics -> Conversions -> Ecommerce.)
Search Terms report: This report lets you see the exact keywords your visitors are using to search so you can adapt your content accordingly.
(Here’s how to find this report: Google Analytics -> Behavior -> Site Search -> Search Terms.)
Landing Pages report: This report shows you the length of time visitors spend on each of your pages along with the bounce rate. This way, you can tell which of your pages and offers provide the most (and least) value to people.
(Here’s how to find this report: Google Analytics -> Acquisition -> Social -> Landing Pages.)
Lifetime Value reports: These reports illustrate the value of each of your visitors as they interact with your website and stores. You can learn lifetime value (LTV) metrics like revenue per user, page views per user, sessions per user, and transactions per user.
(Here’s how to find this report: Google Analytics -> Audience -> Lifetime Value.)
Now that you know some of the ways Google Analytics can benefit your business, let’s dive into how you can set up Google Analytics to work with your Etsy, eBay, and UseGearBubble shops.
How to Track Your Etsy Shop with Google Analytics
To help monitor important metrics with your Etsy business, including site visits, page views, popular content, page referrals, and keywords used to find certain items, there’s a free service you can use, which works together with Google Analytics.
It’s called Etsy Web Analytics. And here’s how to set that up for your Etsy shop:
- Go to www.google.com/analytics.
- Click the sign in link at the top right and select “Analytics.”
- Go to the “Admin” section at the bottom left and select “Create new account” from the dropdown.
- Where it says “Account Name,” put the name of your Etsy shop.
- For “Website Name,” you can put “Your Shop Name Etsy” or “My Etsy shop.”
- Where it says “Web Site URL,” put www.etsy.com/shop/yourshopname.
- Select your “Industry Category” and “Reporting Time Zone.”
- Click “Get Tracking ID” and accept the terms of service.
- On the next page, you’ll find your tracking ID, which should begin with the letters UA.
- Copy that and go to your Etsy shop.
- Click “Shop Manager” and then go to “Settings” on the left and choose “Options.”
- Click the “Web Analytics” tab at the top.
- Paste the tracking ID where it says “Web Property ID” and click “Save.”
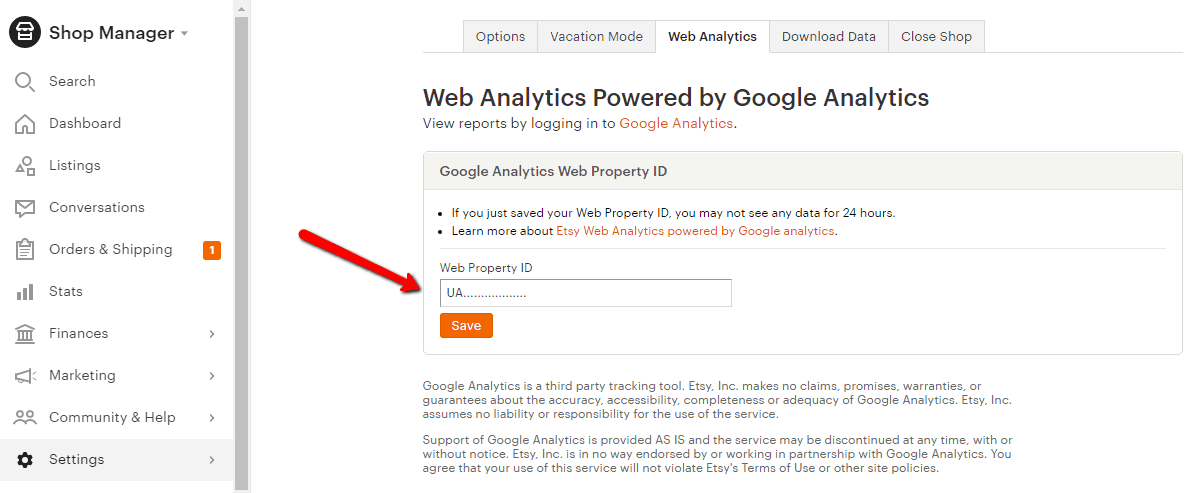
Google should now begin collecting data from your Etsy shop.
Then, if you go back to Google Analytics “Audience” and “Overview,” you can see the data from your Etsy shop as Google starts to collect it.
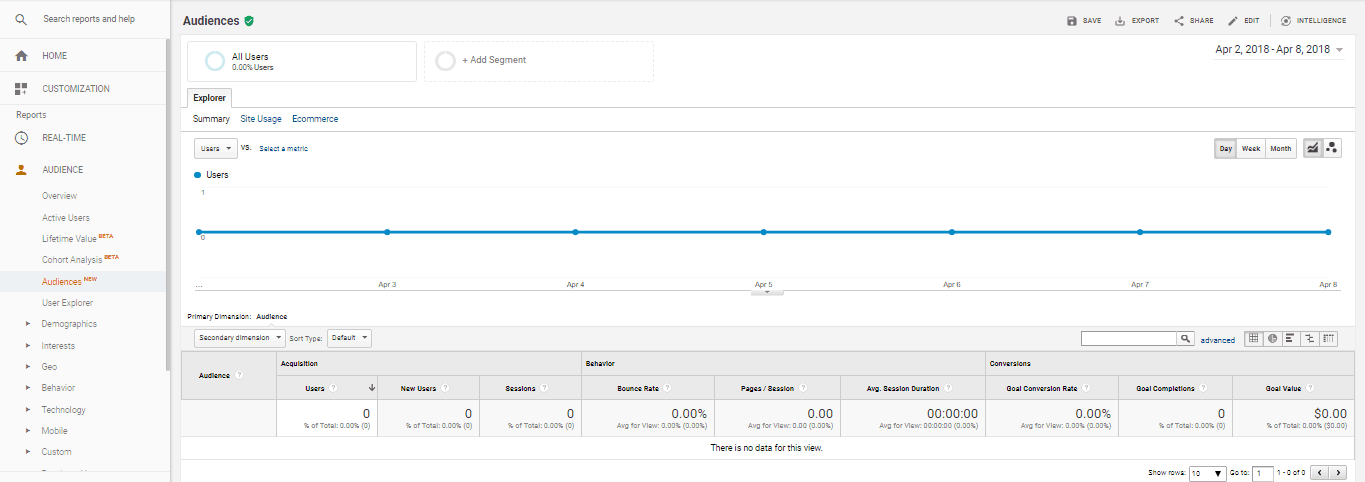
(NOTE: It can take up to 24 hours before any data starts to show.)
Also under “Audience,” if you click “Demographics,” you have the option to enable “Demographics and Interest Reports,” which is recommended. Turning on this feature shows you information about your visitors’ demographics, including their age and gender.
Another thing you want to do is remove yourself from the tracking so your own visits to your shop aren’t counted, thus inflating your site’s number of page views. To do this…
- You need to find out your IP address (to do this, go here) and copy it.
- Back in Google Analytics, go to the “Admin” tab.
- Then, “Filters” and “Add filter.”
- Give the filter a name, like “Ignore Me.”
- Make it a “Predefined” filter and exclude traffic from the IP address that’s equal to…
- Paste your IP address in the space provided.
- Click “Save.” This will now exclude traffic from your IP address from Google’s data collection.
How to Track Your eBay Listings with Google Analytics
Tracking your eBay analytics is a little different from Etsy, but you can accomplish the same types of goals in terms of tracking the popularity of your listings and the number of people who visit your shop.
You’ll need to get the eBay-approved third-party app called Ki Googalytics. The application is free to try, but it does cost $3.99 a month or $29.99 a year after the trial ends.
This app adds a small image add of the bottom of your eBay listings and then acts as a proxy, taking the information gathered on the images and transferring it to your Google Analytics account so you can track your eBay analytics directly from there.
If you get the stealth version of the app, the image is invisible. Otherwise, you’ll see a little icon at the bottom of your listings that looks like this:
![]()
After signing up for Ki Googalytics…
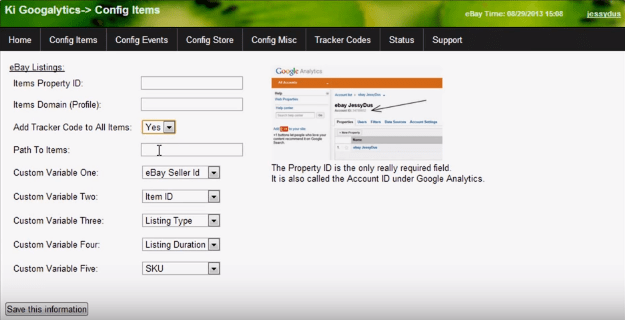
- Go to the homepage and then to “Config items.”
- For the “Items Property ID,” you’ll need to refer to your Google Analytics account.
- Go to www.google.com/analytics.
- Click the sign in link at the top right and select “Analytics.”
- Go to the “Admin” section at the bottom left and select “Create new account” from the dropdown.
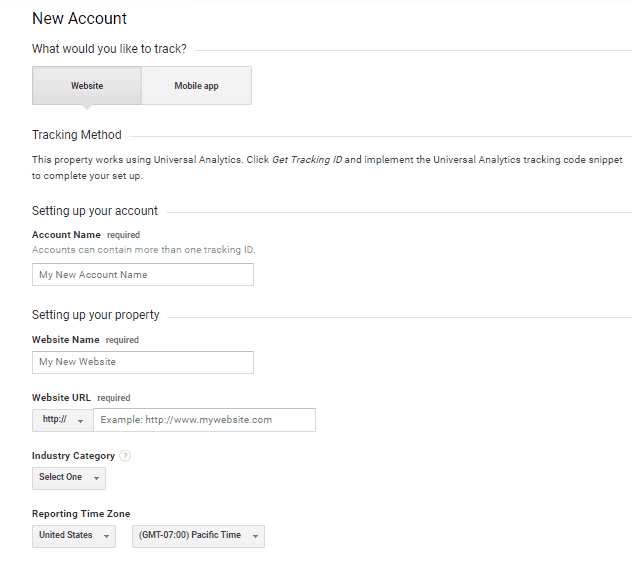
- You can put anything you want for “Account Name,” but I suggest something like “eBay tracking.”
- For “Website Name,” put www.ebay.com.
- For “Web Site URL,” put www.ebay.com.
- Have the reporting timezone be Pacific Time since eBay is located on the west coast of the US.
- Click “Get Tracking ID” and accept the terms of service.
- Copy the tracking ID that shows at the top of the next page. It will begin with the letters UA.
- Go back to Ki Googalytics and paste the tracking ID where it says “Items Property ID.”
- Where it says, “Add Tracker Code to All Items,” make sure “Yes” is selected.
- For the “Items Domain (Profile),” use www.ebay.com.
- And for “Path To Items,” use www.ebay.com/itm/.
- For the rest of the items, you can just leave the default settings (as shown in the screenshot above).
- Click “Save this information.” The tracking code will then be added to all of your eBay listings.
It can take a bit of time for the program to add all of the tracking codes, but here’s how you can tell if the code has been added properly so you know it’s working:
- Go to eBay and click on one of your listings.
- Scroll to the bottom of the page and look for the Ki Googalytics icon. If you aren’t using the stealth version, the icon should appear and you’ll know the tracking is working.
- If you are using the stealth version, however, the icon will not appear and you will need to right click and select “View frame source” from the dropdown.
- Scroll to the bottom of the code that appears and look to see if you can find this: <!—added by Ki Googalytics –>. If you can find that, you know the tracking is working in stealth-mode.
How to Use Google Analytics with UseGearBubble
Setting up Google Analytics for UseGearBubble is probably the simplest of the three, and it can help you monitor things like how many people come to your store and how long they stay.
To set Google Analytics up for UseGearBubble…
- Go to www.google.com/analytics.
- Click the sign in link at the top right and select “Analytics.”
- Go to the “Admin” section at the bottom left and select “Create new account” from the dropdown.
- Where it says “Account Name,” put your store’s name.
- For “Website Name,” you can put “Your Gear Bubble” or whatever else you want that’s related to GB.
- Where it says “Web Site URL,” put www.gearbubble.com.
- Click “Get Tracking ID” and accept the terms of service.
- On the next page, you’ll find your tracking ID, which should begin with the letters UA.
- Copy that and go to your UseGearBubble account.
- Go to “Settings.”
- Click the “Tracking Pixels” button.
- Where it says, “Default Google Analytics Tracking ID,” paste your Google Analytics tracking ID.
- Click “Save Changes.”
UseGearBubble also says the following: “Please remember to enable ecommerce for purchase and checkout. More details here.”
According to the Google Analytics support page, this is how you enable ecommerce for a view:
- “Sign in to Google Analytics.
- Click Admin, and navigate to the view you want.
- In the VIEW column, click Ecommerce Settings.
- Set Enable Ecommerce to ON.
- Optional: Set Enable Related Products to ON.
- Click Next step.
- Click Submit.”
How to Get Started with Google Analytics
As previously mentioned, you need to have a Google account, like Gmail, to set this up. Assuming you already have that, go to www.google.com/analytics. Then…
- Click the sign in link at the top right and select “Analytics” from the dropdown.”
- A new tab will open. Click “Sign up.”
- Go through the process of filling in your account information (name, website, URL, etc.).
- You can also check or uncheck the Data Sharing Settings.
- Click “Get tracking ID.”
- Accept the terms.
- You’ll be taken to where you need to copy your Website tracking code.
- Then, depending on where you want to add Google Analytics tracking, you’ll paste that code into the space provided and within two hours Google should begin providing data about that site’s analytics.
After you get set up your profiles, you can scroll through and find out all kinds of valuable information. Check out the “Here’s How Google Analytics Can Improve Your Business” section above and pick your pleasure to get started!
What do you think about using Google Analytics to track performance metrics with your Etsy, eBay, and UseGearBubble stores? Is monitoring things like site views, visitor demographics, and page referrals something that’s important to you? Please leave a comment below and let me know what you think!
